By Akeneo Certified, Solution Developer, Dett Martin and Senior Director, Solution Architecture, George Dzuricsko
In the process of developing with Akeneo it becomes quickly apparent that you need a local install for testing ideas and running code without the concern of affecting others using the instance. For quick and simple tasks having a shared sandbox is very convenient, but quickly reveals its drawbacks when other team members are working with it.
The first step for someone new to a system is to search the web for installation instructions to save time getting directly to the information needed – after all, we can always come back and deep dive later. Getting started is always the biggest hurdle to new development. Luckily Akeneo comes with a lot of documentation to help get us started, and can easily be located at their docs.akeneo.com site. Immediately you’ll see the two options, Install with Docker or Install Manually.

Because I’m stubborn and less familiar with docker, my attention instantly jumped to the manual installation. The installation mostly references external resources such as the official MySQL documentation. Overall, the process is straightforward as long as you follow the steps carefully. You have to install a typical LAMP (Linux Apache MySQL PHP) stack, including additional pieces like Composer PHP package manager and ElasticSearch, along with Node and Yarn for the front-end.
This all went much smoother than I expected, and I had a working local copy of Akeneo in a short time. To borrow a phrase from the band Puddle of Mudd, it “went well for a week or two, then it all came unglued.” As a consultant, I rarely work with one client at a time, and replicating their data locally for testing ideas doesn’t run as smoothly when there’s more than one instance to maintain. You have additional configuration setting up more virtual hosts for apache, different MySQL databases, and ElasticSearch is a headache in itself especially with memory consumption.
After admitting I was wrong and realizing I should embrace newer technologies, I decided to give docker a chance. This has the added benefit of keeping data isolated, and simply running make down lets you conserve memory for an instance you’re not actively using. This did come with a few curveballs as well, but nothing a few minutes of searching couldn’t resolve. The two main headaches came from using the private repository for the enterprise edition of Akeneo, and the persistence of the databases.
If you’re using the community version of Akeneo, you won’t have to worry about sharing your SSH keys with the docker instance. However, for Enterprise Editions you need to take a few extra steps. Similar to a manual install, the first step is to generate a local SSH key if you don’t already have one. For me, I’m using Ubuntu 20.04 within WSL (Windows Subsystem for Linux) so it was as easy as running ssh-keygen and following the prompts. Because I choose to use a different key for most things, I created a simple config file in my ~/.ssh directory to ensure distribution.akeneo.com has IdentityFile defined for my Akeneo specific key. Once your key is generated, be sure to copy the contents of the .pub file and add the Public Key to your account at portal.akeneo.com. This can be achieved by simply clicking your username at the top-right of the page and going to Manage public keys, then using the “ADD PUBLIC KEY” button on the following page. Keep in mind that if your public key isn’t loaded into the Akeneo portal, you will not be able to access the private repository defined in the composer.json file.
In my first attempt at installing, I noticed the command-line for the initial composer install created a volume link for my local ~/.ssh to /var/www/.ssh within the docker instance. Foolishly, I expected that to work on its own, but as with any properly secure install the SSH keys don’t have the correct permissions and will fail to let you access the private repository. Luckily, if we keep reading, Akeneo already outlines the solution to this by sharing the official Docker documentation on private repositories. In summary, we simply need to run eval `ssh-agent -s` to start the SSH Agent, and then ssh-add ~/.ssh/akeneo to add access to your Akeneo key to the agent (Keep in mind you should replace akeneo with whatever you named your key, the default in most cases is id_rsa.) Lastly, when running the docker run command to execute the composer install, ensure you’re adding the following two options to share your SSH Agent socket with the instance: -v $SSH_AUTH_SOCK:/ssh-auth.sock -e SSH_AUTH_SOCK=/ssh-auth.sock These two options simply replicate your SSH Agent socket file with the container, and sets the SSH_AUTH_SOCK environment variable to point to it.
Once your composer install completes, you’ll have all the source code ready for deployment. Akeneo comes with a handy makefile to reduce the commands you need to enter to get things going. If you’re going to work with a Flexibility version and plan to edit the Akeneo source for customizations, you’ll probably want to start with make dev to spin up the Akeneo instance in a development setting. If you’re sticking with API requests on a Serenity version, you may wish to stick to using make prod to more closely replicate what the cloud hosted version will be like.
Before running the make command, we need to address persistence. By default, when you spin down an instance the database volume is erased and spinning up another instance gives a clean slate. This can be ideal in some situations, but in my experience it’s better to keep the data and a fresh start can be achieved by simply removing the saved copy. The easy way to achieve this is to tell docker to create volumes that reference local directories where the data will persist between launches. We can accomplish this by creating a new file in the main directory called docker-compose.override.yml and giving it the following contents:
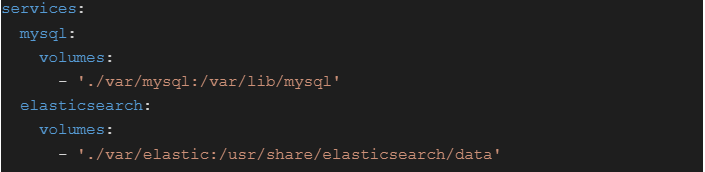
This will cause the docker instance to save all MySQL data in the local directory ./var/mysql and all ElasticSearch data in ./var/elastic – Please keep in mind the single period at the beginning of each means relative to the local directory (where you extracted the PIM archive.)
Depending on running make with the argument dev or prod will determine what database fixture to use – these are defined in the makefile as using “minimal” for prod and “icecat_demo_dev” for dev. Any custom database fixture can be created by copying the directory and editing any files to your liking, then pointing your makefile to that new directory. For simplicity, I stick with the minimal install where I can load data as needed that is relevant to what I’m working on. The main drawback with the minimal copy is that no users are defined. To save a step, I modified my copy of the makefile to include a “user” section that runs the pim:user:create command with a basic admin user.

This way I can just copy over my makefile for any new instance and I don’t have to keep track of the syntax for the command. Additionally, I’ve added $(MAKE) user just after the $(MAKE) database command to automate this step when building a prod copy.
There are a few instances where file permissions have become a problem, typically when mistakenly running make commands or docker commands using sudo. Keep in mind that all files within the directory should be owned by your local user – or whichever user is defined with the uid and gid of 1000. In my case, under WSL my primary user meets this condition.
If you run into file access issues within ./var/cache, it’s normally quickly resolved by force deleting everything within the cache directory using sudo rm -rf var/cache and then running the make command again.
Thanks to a few minor tweaks and some trial-and-error of the process, it’s now very easy and convenient to spin up a new copy of an Akeneo instance locally. I can spin it down as needed to open another instance, without worrying about having to reload all the data I’m working with. Additionally, if I need to run two instances at once, it’s easy to go in and modify the environment variables to give different ports or database names.
In addition to adding shortcuts to the makefile, you can also make use of various aliases in your bash script such as the following for spinning the docker instance up, loading the bash instance for PHP’s fpm, or spinning the instance down:

I hope the additional context here, along with the official Akeneo documentation, helps you spin up your own copies for testing.
Contact us here at Sitation for your Akeneo support needs.